git: https://github.com/Ryan-Mus/MarioBros3PhysicsDemo
For my programming 2 course @DAE we had the assignment to recreate a game level of a 2D game. I chose Super Mario Bros. 3. World 1 level 2
In class we saw how to do detect collision with raycasts. I wanted to challenge myself and I choose to make all collisions newton physics based.
How I did it
Collision checks
For the raycast method, we learned how to export and import an SVG file that contains lines of the map. These are the red lines in the image below.

Mario is physically represented as a ball with a certain mass, making it easy to check for collisions. We only need to measure the distance from the center of Mario to a line.
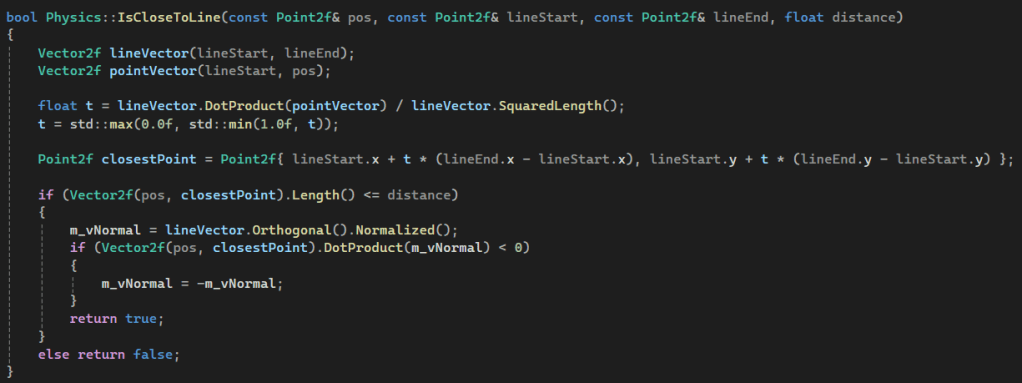
This function starts with converting Mario’s position and the two endpoints of the line into two vectors. One vector is the line itself and the other vector is the line between the start of the collision line and Mario. With these two vectors, I can project Mario’s position on top of the collision line using the dot product of these two vectors. I then calculate how far along this point lies on the collision line. By using this calculated distance, I can then determine the exact world position of the projected point. This point is the closest point to Mario. I then calculate the distance between Mario and the projected point. If this point is equal to or closer to Mario than its radius, we have a collision. When I have a collision, I set my normal vector so it points towards Mario.
Calculating Forces
Every frame I calculate all forces that affect Mario. I then combine all these forces to have a resulting force. I use that force to calculate the acceleration of Mario using
Newtons Law: F = m*a
Since we are not in a realistic world I used 1 kg as mass for Mario making it even easier: F = a.
Gravity
In the real world gravity is a force equal to m * g with g = 9.81 m/s². But Mario is not the real world so I used a tested value of 600. Since every force is represented as a vector the value of the gravity vector is (0,-600). Gravity is represented by the blue vector.
Player Input
Since the player can control Mario, we need to calculate a force that represents the player’s input. Mario can be controlled with the 4 arrow keys. The down arrow doesn’t apply a force. The left and right arrows are easy to manage, using a constant force when the player presses the keys. The left arrow key equals a test force vector of (-1050,0) and the right (1050,0). The up key, or in other words, the jump force, is more complicated. First of all, we need to keep in account that gravity is also currently affecting Mario. Secondly, if the player keeps pressing up, after a certain moment it should stop applying a force; otherwise, Mario goes up forever. Thirdly, it also feels very wrong if Mario accelerates up midair; that would feel like Mario is Superman. So for the initial jump, I don’t use a force, but I give Mario a certain upward velocity. Since gravity is also influencing Mario, he is constantly decelerating, meaning his velocity changes constantly to a point that Mario’s velocity is back down, making Mario fall down. In the original game, you can jump to different heights depending on how long you press the Jump button. In my version, this is also possible. I did this by extending the period that Mario has a constant upward velocity.

The black line is the player’s input force. The red line, which originated from Mario, is the velocity of Mario. The white line is all the forces combined.
React Force
In static mechanics, an object is in equilibrium if the total force is equal to zero. In our situation, there are currently two forces acting on Mario: gravity and player input. When Mario is on the ground, there is a third force at play, namely the reaction force. Without this force, Mario would simply fall through the floor and accelerate to infinite speeds. To calculate this reaction force, we need to project all the forces affecting Mario onto the normal of the line on which Mario is standing. We can, just like in the collision check, project the forces using the dot product. We project all forces onto the normal because the reaction force can only push back in the direction of the normal. We also check with the dot product whether the forces are on the correct side of the line. After the projection, we invert the projected vector because it is a reaction force. If there is no player input, then the sum of this reaction force and all other forces is zero. This ensures that Mario can now stand still on a floor.
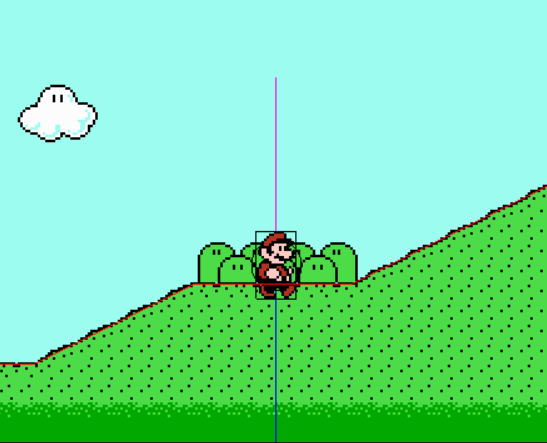
Reaction force is the magenta line.
Friction
In high school we could sometimes ignore friction. But in this case we cannot. We have to take into account friction; otherwise, Mario would not be able to stand on a ramp. Friction is calculated using the reaction force and the coefficient of friction. The direction of the friction force is parallel to the collision line and points in the opposite way of the reaction force. If the needed the force for an equilibrium is smaller then the calculated reaction force times coeffiction of friction then we can use that needed force. But when the friction force is smaller then the needed froce we use the friction force. For the coefficient of friction I have two values: One value is used when the velocity is near zero so that for example Mario can stand still on a ramp. The other value is used when Mario is moving. This is the dynamic friction. This makes it possible for Mario to move up on a ramp or to slide down a ramp.

Total force
All these forces are then combined to a total force. With this force the acceleration is calculated.

Bounce
Mario can bounce on multiple things. He bounces on enemies to eliminate them, on top of note blocks to rebound, and against lucky blocks to get items. Bounces are super easy to calculate. Each object has an elasticity value that I assign. To apply the bounce, I simply mirror the velocity around the collision line and multiply it by the elasticity factor.
What I learned
This was my first time making a game in C++ and I wanted to challenge myself to use the physics that I learned in high school. With lots of struggling, debugging, and finding things out, I made it work. I’m proud of what I have achieved in the time that I worked on this project. One of the things that was important for me was decent performance, so I avoided using cosines, sines, tangents, and other heavy operations. I mostly use the dot product, which consists of just simple multiplication. This project has shown me what floating-point errors actually mean and how to use classes better. I learned that magic numbers are a big NO-NO when making this project because trying to find what some random number means after coming back a few days later to my code is a nightmare. I also learned that splitting up functionality and making every function do one thing only is very important to keep the code clean, readable, and usable. This project can be significantly improved. There are still plenty of things that I did wrong. But that is for the next project.
